Quick Compatibility Check
This method works if your device meets all of the following conditions:
- Your device has a DDNS settings page with a Server Address, Server IP, or DDNS Server field.
- That field is editable — you can delete the default value and type a new one.
- The default value is one of:
members.dyndns.orgordynupdate.no-ip.com - Your device allows selecting No-IP or DynDNS as the DDNS type.
Common compatible devices: Many Hikvision and Dahua cameras and DVRs, OEM brands built on Hikvision or Dahua platforms, and some routers with editable DDNS server fields.
Not compatible: Devices that lock the server address to a specific provider, devices that only support vendor-exclusive DDNS (e.g., Hik-Connect only), or devices that hide the server address field entirely.
If your device does not meet these conditions, skip this guide and follow a different installation method in our complete DDNS installation guide.
What This Method Does
Most CCTV cameras, DVRs, and routers come with built-in DDNS support, but they only offer a few predefined providers — typically No-IP and DynDNS.
These devices connect to a specific server address to send IP updates. By default, that address points to No-IP or DynDNS servers. The idea is simple: replace that address with dyn.fastddns.net, and your device will send updates to FastDDNS instead.
FastDDNS is designed to work with devices that support No-IP or DynDNS-style DDNS update settings and allow the server address to be changed. No extra software is needed — the device handles everything using its built-in DDNS client.
Before You Start
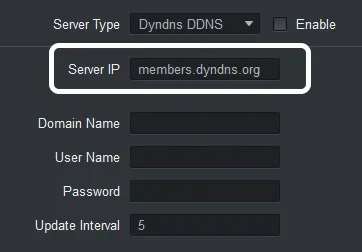
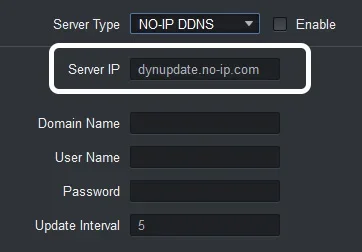
Open your device's DDNS configuration page and find the server address field. It may be labeled Server Address, Server IP, or DDNS Server depending on your device and firmware version.
By default, it will contain one of these values:
- DynDNS:
members.dyndns.org - No-IP:
dynupdate.no-ip.com
Here are examples of what these fields look like on real devices:
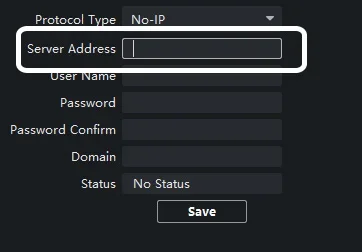
Confirm that you can select and delete the text in this field. If the field is grayed out or not editable, this method will not work on your device.
Step 1 – Create a Hostname on FastDDNS
Before configuring your device, you need a FastDDNS hostname. If you don't have one yet:
- Go to FastDDNS Getting Started and create a free account.
- Create a new hostname — for example,
dynsvr.fastddns.org.
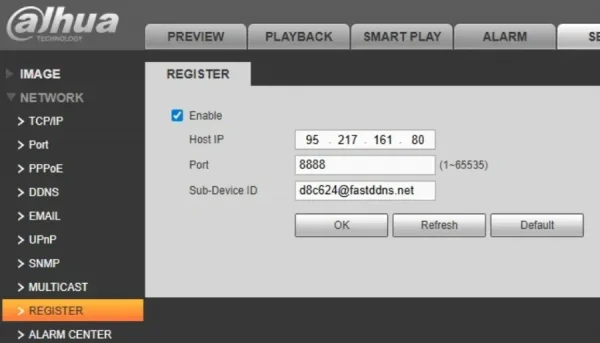
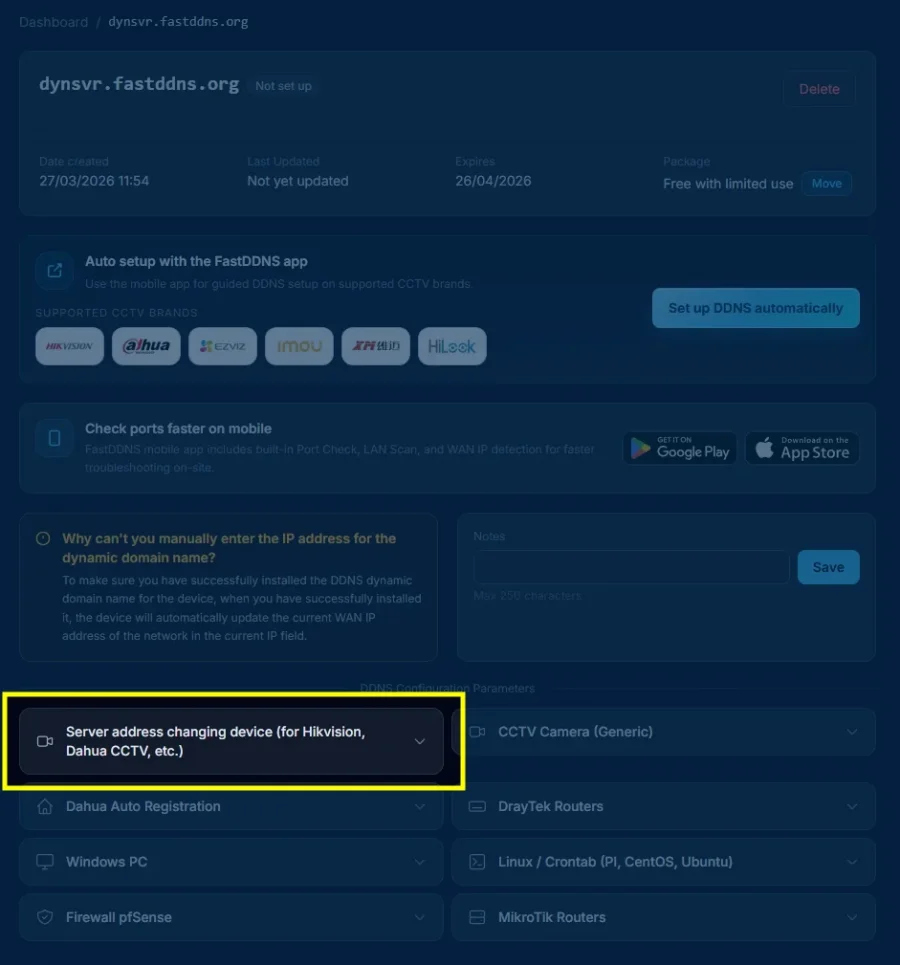
After creating the hostname, open its management page. You will see a list of supported setup methods.
Click on "Server address changing device (for Hikvision, Dahua CCTV, etc.)" to open the configuration parameters.
Step 2 – Copy Configuration Parameters
After clicking the setup method, a panel will appear with all the values you need to enter on your device:
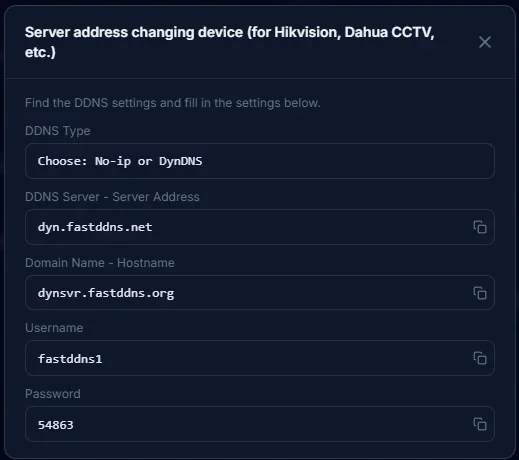
Different devices use different labels for the same fields. Use the table below to match the FastDDNS parameter to the correct field on your device:
| Device Field Name | Enter This Value | Notes |
|---|---|---|
| Server Type / DDNS Type / Protocol Type | No-IP or DynDNS | Either option works — choose whichever is available |
| Server Address / Server IP / DDNS Server | dyn.fastddns.net | Delete the default value and type this exactly |
| Domain Name / Hostname / Domain | Your FastDDNS hostname (e.g., dynsvr.fastddns.org) | Copy the full hostname including the domain |
| User Name / Username / Login Name | Your FastDDNS account username | Case-sensitive on some devices |
| Password / DDNS Key / Update Key | Your DDNS update key (shown in the panel) | This is not your account login password |
Important: The password shown in the configuration panel is your DDNS update key — a separate credential used only for DDNS updates. Do not confuse it with your FastDDNS account password.
Step 3 – Replace Server Address on Your Device
Go back to your device's DDNS settings page. Delete the default server address and fill in all fields using the values from Step 2.
Here is an example of a completed configuration on a camera:
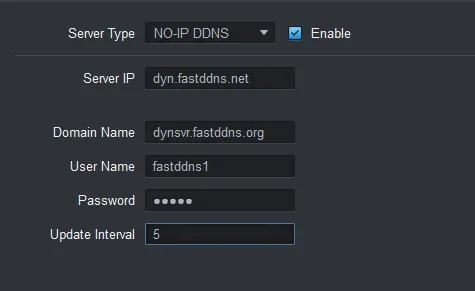
dyn.fastddns.net, Domain Name set to the FastDDNS hostname, and credentials entered. The Update Interval is set to 5 minutes.
After entering all the information:
- Make sure Enable is checked (if your device has this option).
- Click Save or Apply.
- Some devices may require a reboot to start the DDNS update process.
Step 4 – Verify Update Status
Go back to your FastDDNS dashboard and open your hostname's management page. Wait 30 seconds to 5 minutes for your device to send its first update.
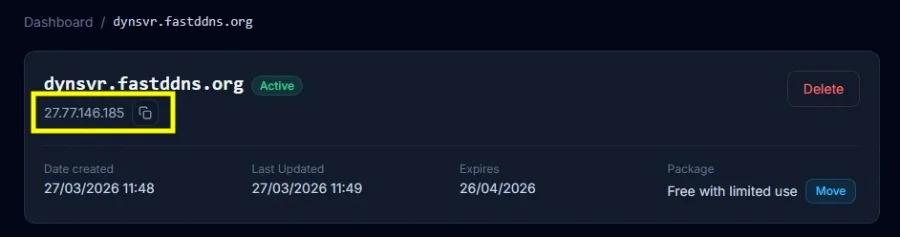
When the update is successful, you will see:
- The status changes to Active (green badge).
- Your current public IP address appears below the hostname.
- The Last Updated timestamp shows the time of the latest update.
Your hostname is now live. Every time your public IP changes, the device will automatically send an update to FastDDNS, and your hostname will always resolve to the correct address.
Expected Status Messages
After saving settings on your device, the DDNS status field (if available) may display one of the following:
| Status Message | Meaning |
|---|---|
| Active / Normal / Succeed | DDNS is working correctly — IP has been updated |
| Connecting / In Progress | Device is attempting to reach the update server |
| Connection to server failed | Device cannot resolve or reach dyn.fastddns.net — check DNS settings |
| Authentication failed | Username or password is incorrect — re-check credentials |
| No Status / Disabled | DDNS is not enabled — make sure the Enable checkbox is checked |
Note: The exact wording varies by device manufacturer and firmware version. Menu names may differ across models.
Common Errors and Fixes
If the IP address does not appear on your dashboard after 5 minutes, try the following:
Check your credentials
Make sure the hostname, username, and DDNS update key entered on the device match exactly with the values shown in the FastDDNS configuration panel. A single typo will cause the update to fail silently.
Change DNS server on the device
Some devices cannot resolve dyn.fastddns.net using their default DNS. Go to your device's network settings and set the DNS server to:
Primary DNS:   8.8.8.8
Secondary DNS: 8.8.4.4
Restart the device
Some cameras and DVRs only trigger a DDNS update during boot. A simple restart will force the device to send an update immediately.
Factory reset and reconfigure
If none of the above steps work, reset the device to factory defaults and re-enter the DDNS settings from scratch. Occasionally, firmware bugs cause corrupted DDNS configurations that persist even after changing values.
Use a different setup method
If your device still cannot update, the server address method may not be compatible with your specific model. Try other DDNS installation methods.
When This Method Will Not Work
This method relies on the device allowing a custom server address. It will not work in the following situations:
- Locked server address: The device has a DDNS type dropdown, but the server address field is read-only or hidden. Common on some newer firmware versions.
- Vendor-locked DDNS only: The device only supports a proprietary DDNS service (e.g., Hik-Connect, IMOU P2P) with no option for standard No-IP or DynDNS.
- Cannot resolve the server: The device's built-in DNS client fails to resolve
dyn.fastddns.net. Try changing DNS to8.8.8.8first — if that doesn't help, the firmware's DNS implementation may be limited. - Wrong credentials: The DDNS update key is different from your account password. Double-check the values in the FastDDNS configuration panel.
- Firmware hides the DDNS page: Some devices remove DDNS settings entirely in certain firmware versions.
If any of these apply, try one of the alternative DDNS setup methods.
Tested Device Categories
This method has been tested successfully on:
- Hikvision DVR and IP cameras — View Hikvision OEM brand list
- Dahua DVR and IP cameras — View Dahua OEM brand list
- OEM brands built on Hikvision or Dahua platforms
In general, many devices that support No-IP or DynDNS and allow editing the server address field are compatible with this method. Menu names and field labels may vary by model and firmware version.
Want to check if your device's ports are open for remote access? Use the FastDDNS Port Check tool to verify connectivity.
Frequently Asked Questions
Can I use FastDDNS with No-IP or DynDNS settings on my device?
Yes. Select No-IP or DynDNS as the DDNS type on your device, then replace the server address with dyn.fastddns.net and enter your FastDDNS credentials. Either DDNS type will work.
My device does not allow me to change the server address. What can I do?
If you cannot edit the server address field, this method is not compatible with your device. You can still use FastDDNS through a different installation method. See our guide: How to install dynamic DNS for free for all available setup options, including the FastDDNS mobile app and other methods that do not require changing the server address.
How long does the DDNS update take?
Most devices send the first update within 30 seconds to 5 minutes after saving the settings. If you do not see an update after 5 minutes, check the troubleshooting section above.
Does this work on routers, too?
Yes, some routers (including DrayTek, TP-Link, and others) support No-IP or DynDNS with an editable server address. The setup process is the same. For DrayTek routers specifically, see the DrayTek DDNS setup guide.
What is the difference between the DDNS update key and my account password?
The DDNS update key (shown in the FastDDNS configuration panel) is a separate credential used only for device-to-server DDNS updates. It is not the same as the password for your FastDDNS account.
What should I enter for the Update Interval?
Most devices default to 5 minutes, which is a good starting point. Lower values (e.g., 1 minute) mean faster IP updates but generate more traffic. Higher values save bandwidth but may result in a longer gap when your IP changes.