⚠️ Important: Changing your device's DNS settings will redirect all DNS queries through FastDDNS servers. This may cause some features to stop working, including:
- Cloud-based remote viewing (DMSS Cloud, Hik-Connect, EZVIZ, etc.)
- P2P connections through the manufacturer's app
- Email notifications sent from the device
If you rely on these features, consider using Method: Replace the DDNS Server Address or the FastDDNS Windows Client instead.
What You Need Before You Start
- A free FastDDNS account — sign up here
- A hostname already created in your FastDDNS dashboard
- Access to your device's web interface (usually via a browser on the same network)
- Your FastDDNS credentials: Username, Password, and Hostname
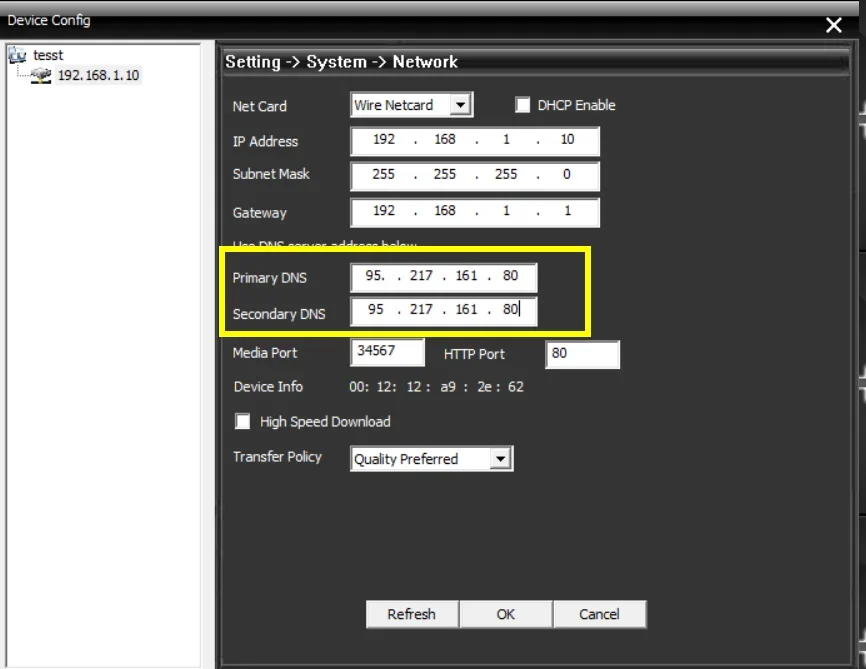
Step 1: Change the DNS Address in Your Device's Network Settings
Open your device's web interface and navigate to the Network or TCP/IP settings page. Look for the DNS fields — they are usually labeled Preferred DNS (or Primary DNS) and Alternate DNS (or Secondary DNS).
Replace the existing DNS addresses with the following FastDDNS DNS servers:
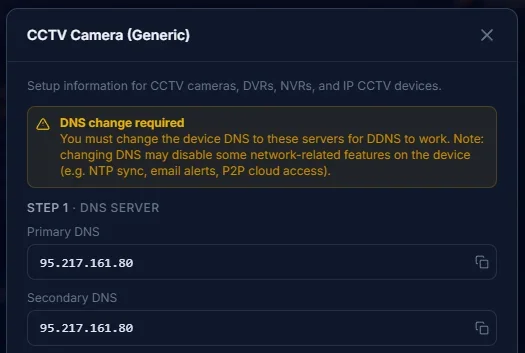
| Field | Value |
|---|---|
| Primary DNS (DNS 1) | 95.217.161.80 |
| Secondary DNS (DNS 2) | 95.217.161.80 |
The above server information may be changed, for the most accurate reason, enter the hostname information to get DNS 1 and DNS 2 that are correct for the current time.
Save the settings. Some devices may require a reboot to apply the change.
Tip: The exact menu path varies by brand. For example:
- Dahua: Setup → Network → TCP/IP → DNS Server
- Hikvision: Configuration → Network → Basic Settings → TCP/IP
- Xiongmai / XMEye: System → Network → TCP/IP
See the device-specific guides for detailed screenshots.
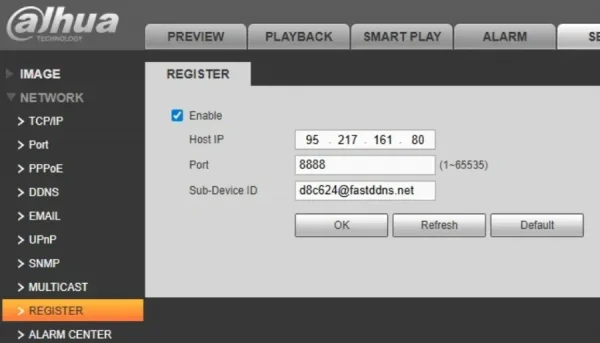
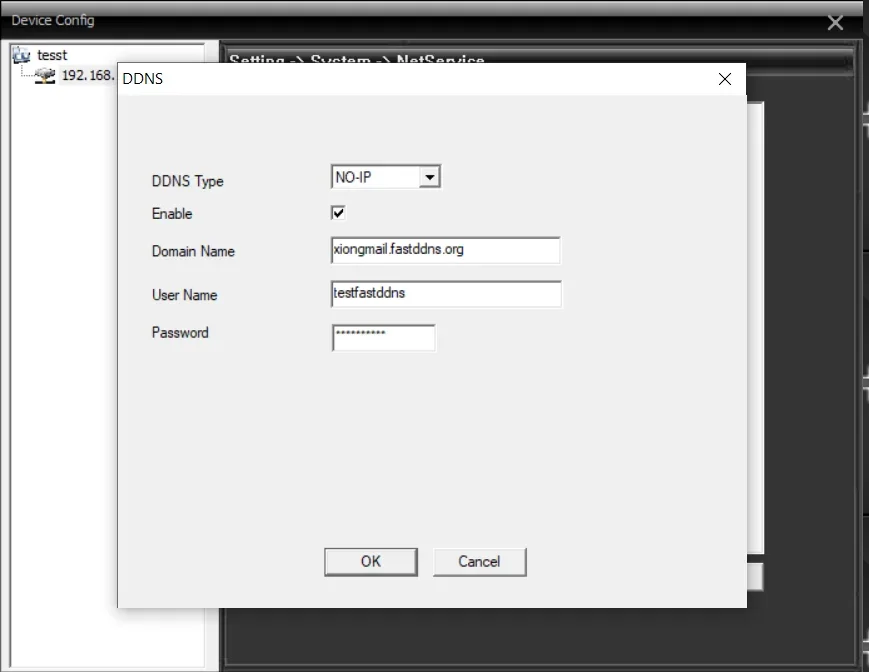
Step 2: Enable DDNS and Enter Your FastDDNS Credentials
Navigate to the DDNS settings on your device. This is usually found under Network → DDNS or Network → Advanced Settings → DDNS.
Configure the following fields:
| Field | What to Enter |
|---|---|
| Enable DDNS | ✅ On |
| DDNS Type / Provider | Select DynDNS or No-IP (either works) |
| Server Address | Leave as default, or enter dyn.fastddns.net if editable |
| Username | Your FastDDNS username |
| Password | Your FastDDNS password |
| Hostname / Domain | Your FastDDNS hostname (e.g., mydevice.fastddns.net) |
Save the settings.
Where to find your credentials: Log in to fastddns.net, go to your hostname management page. Your Username, Password, and Hostname are displayed there.
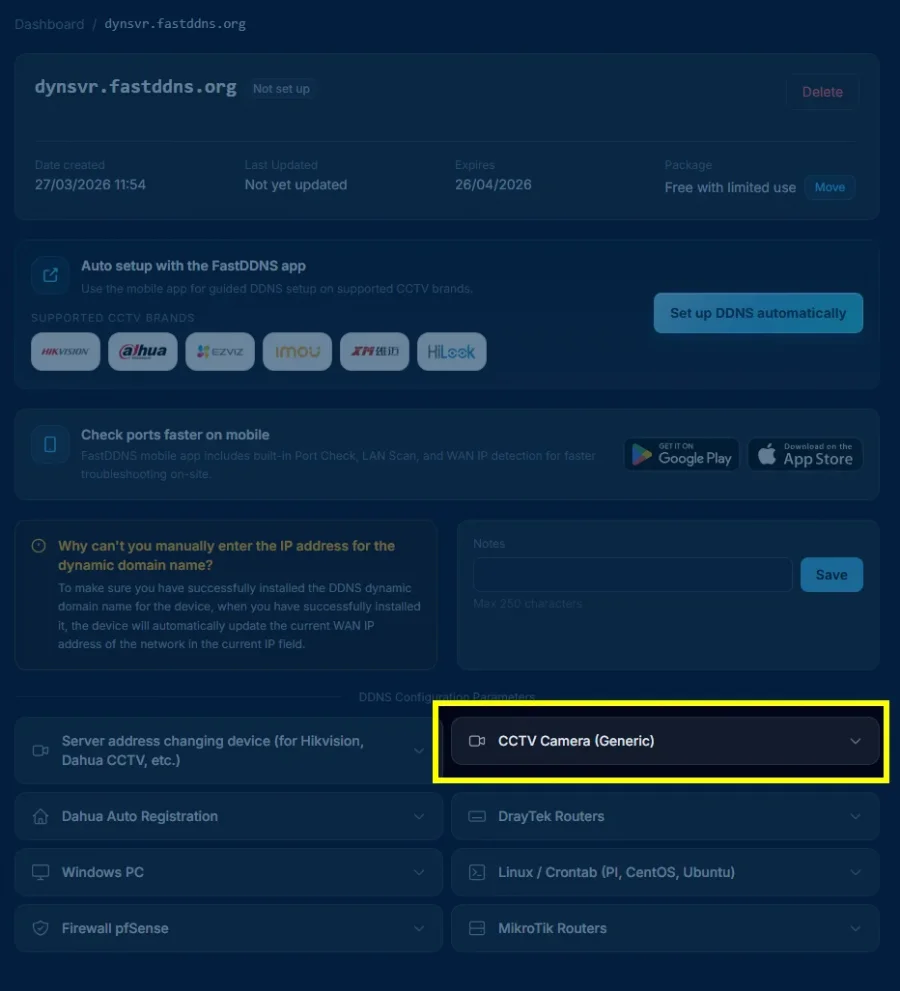
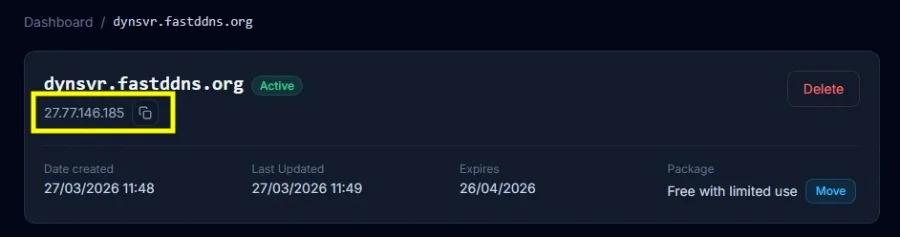
Step 3: Verify that your hostname has been updated
Go back to your FastDDNS dashboard and check the hostname you just configured. The system may take 30 seconds to 5 minutes to receive the first update from your device.
What success looks like:
- Your current public IP address appears next to the hostname
- The "Last Updated" timestamp is recent
Troubleshooting
If the IP address does not appear after 5 minutes, work through these steps in order:
1. Double-check your credentials. Make sure the Username, Password, and Hostname entered on the device exactly match what is shown in your FastDDNS dashboard. Watch for extra spaces or typos.
2. Confirm DNS was changed correctly.
Go back to the device's TCP/IP settings and verify that the Primary DNS is 95.217.161.80 and Secondary DNS is 95.217.161.80. If the device reverted to its old DNS after saving, try saving again and rebooting.
3. Restart the device. Some devices only apply DNS and DDNS changes after a full reboot — not just a "save."
4. Factory reset as a last resort. If the above steps do not work, reset the device to factory defaults, then repeat Step 1 and Step 2 from scratch.
5. Try an alternative setup method. If this DNS-based method does not work for your device, you can:
- Replace the DDNS server address (works without changing DNS)
- Use the FastDDNS Windows Client (runs on a PC on the same network)
- Use the FastDDNS Mobile App (update DDNS from your phone)
- Update via HTTP API (for advanced users and scripts)
Tested Devices
This method has been successfully tested on the following devices and apps:
| Device / Platform | Default Port |
|---|---|
| Hikvision / Hilook | 80 / 8000 |
| Dahua | 80 / 37777 |
| UNV (Uniview) | 80 |
| Tiandy | 80 / 3000 |
| Xiongmai-based recorders (XMEye, GoodEye, vMEyeSuper) | 80 / 34567 |
Your device is not listed? If your device has both DNS and DDNS settings in its web interface, this method will likely work. Contact us or check the full device guide list for more options.